 1. Proper Preparation
Proper preparation will help you avoid costly repairs once the basement is complete. Inspect all wood components for rot and insect damage. This may include joists, window frames and more. Look for sagging floor joists that indicate possible weaknesses. You should also inspect concrete walls and floors for cracks and leaks in need of repair. Finally, have all fuel-burning equipment and the home ventilation system inspected to ensure there isn’t a buildup of carbon dioxide in the basement.
What will the intended function of the finished basement be? Whether you are looking to add extra bedrooms, create a space for entertaining or provide a safe place for kids to play, it’s important to have a clear idea of how the space will be used. Start by planning the layout of your finished basement on paper and play around with the location of the rooms. Bedrooms are required to have windows as an emergency exit and areas that will be used for socializing will feel more inviting and open if there is natural light available. You also need to ensure that you leave plenty of space for access to mechanical equipment.
2. Build to Avoid Issues
Traditional stud-framed walls with carpet/underlay on concrete floors can be prone to hidden mold and mildew. This can leave the basement feeling cold and damp, decrease energy efficiency and lower air quality throughout the home. Moisture and condensation can also cause damage to furniture and electronics in the basement. While these problems may not arise in every basement, it is better to build using construction methods that will help avoid these issues rather than face costly updates and repairs in the future.
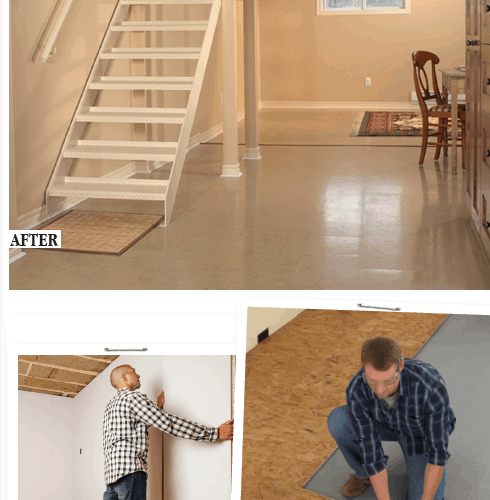
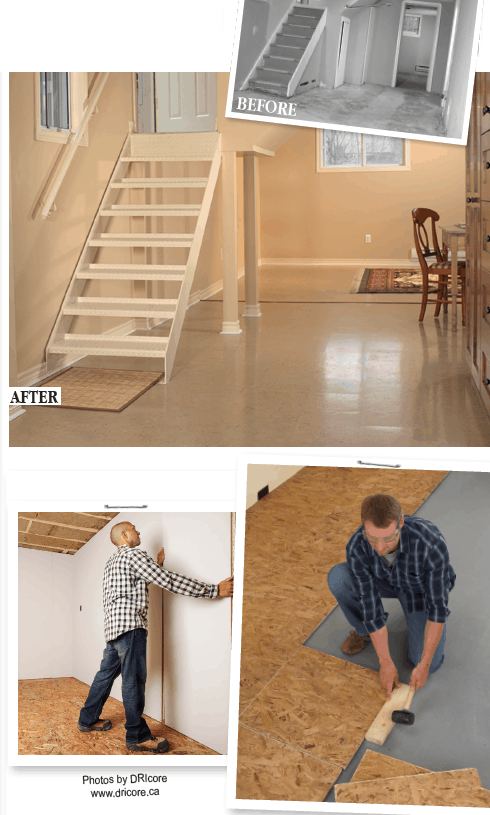
Start your basement renovation with a DRIcore Subfloor system. This creates a vapour barrier between the concrete and flooring materials thus eliminating mold and mildew problems while providing a cushioned floor surface that is both warm and healthy. The Subfloor system uses a tongue and groove interlocking system which installs quickly – in fact in most cases, a 500 sq. ft. room can be installed in one afternoon!
Once the subfloor is installed, the next step is the walls. Instead of building traditional stud-framed walls, consider an engineered wall panel like DRIcore’s SMARTWALL System. This prefabricated wall system will install up to five times faster than traditional walls and makes finishing much simpler. The SMARTWALL System installs directly to the subfloor and floor joists, creating a vapour barrier between the finished wall and concrete. It will help protect your walls from mold and moisture damage.
The last step is to finish the ceiling. Traditional drywall or suspended ceilings are the most common options. The best choice for your basement will depend on the available space and access requirements. Suspended ceilings offer easy access to pipes and ducts in the floor joists but they may hang lower than traditional drywall ceilings. You will also want to consider insulation and soundproofing options depending on the intended use of the basement space. For example, soundproofing the ceiling area may be important if you are putting a bedroom under a main living area or if you are creating a basement rental suite.
3. Finishing Facts
Colours, décor choices and lighting will need to work together to create a cosy, welcoming basement space. There is nothing inviting about a dark, dingy basement. Start by planning for adequate lighting in each room in the basement. This should include a combination of lamps and permanent light fixtures on dimmers to allow better control of the lighting. This will give you the ability to adjust the lighting as needed. Lighting in mechanical areas, hallways and staircases is also important for added safety. For areas that don’t have access to natural light, choose a colour palette that is light and airy. Dark or bold colours will overwhelm an already dark basement space. Mirrored wall décor or furniture can also help reflect light, making the space look and feel brighter.
Latest posts by Canadian Home Trends (see all)
- Creating the Perfect Outdoor Kitchen - April 20, 2024
- Classic Luxury Kitchen Design - April 20, 2024
- Color Journey: Spring 2024 - April 20, 2024


We renovated our garage recently. The concrete flooring was a big mess. We had to find a way to seal it properly. We searched a lot for durable option and finally decided to to do epoxy coating on our floors. Proseal floor care systems did epoxy coating in our garage. We regularly mop the floor to maintain the flooring.
Its better to consult professionals first before doing any renovation to avoid wasting both time and money..