 As veteran herb gardeners can attest, harvesting your herbs and storing them for later use is both easy and difficult, depending on the actual herb. As summer winds down, and harvest time nears—if it hasn’t hit already for some, a quick reminder here and there might be handy. Garlic, one of the toughest to judge timing, is both like and unlike the onion, its garden relative.
Judging Harvest Time
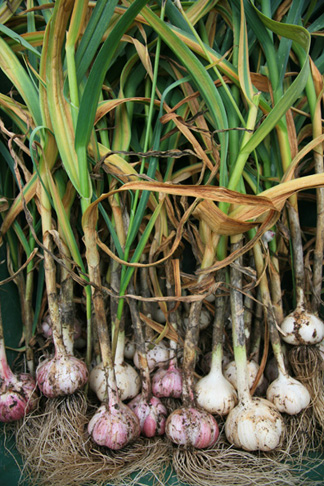
Many new herb gardeners have a difficult time judging when to harvest this plant. Unlike many other plants, these leaves brown from the ground up. Unlike many other bulb plants, do not wait until the entire stalk is brown. As a general rule, wait until about only five or six of the upper leaves are still green, and the lower leaves are brown before attempting it. Harvesting too early can affect both maturity and storage life. Harvesting too late can cause the bulbs to begin separating from each other and affect storage life. As a rule of green thumb, harvest time is any time between late July and early August, depending on your rainfall. However, dry seasons can cause early maturity, so watch them carefully.
Roughly a month before maturity, garlic will send up a scape—a woody flower stalk. You might want to remove those to encourage bulb development instead of reproduction. Garlic scapes are great for dishes like stir fry or sauces and omelets if finely minced. Some gardeners
However—and this is important, do not pull the plant out of the ground by the stalk. If you are unable or unwilling to actually dig the plants out, at least loosen the soil around each plant before lifting. Missing stalks can affect the curing process so necessary before storing your crop for the year.
Proper Curing
While onions can be left on the ground to cure, garlic cannot. Immediately remove the plants from direct sunlight and into fully shaded areas with good air flow, such as into a garage or on a deep porch that has areas always in shadow. Leave the entire plant intact: Don’t remove either the roots or the stalks. Both are important in curing garlic. Remove excess dirt by gently dislodging it with your hand. Don’t risk damaging the stalk by shaking the plant or by rinsing it.
Have a place prepared for curing which can take anywhere from three to six weeks or so, depending on humidity. The spot must be shaded and dry with excellent air flow. Basements or cellars are too damp for good curing. You can hang the plants or place them in single layers. If you must store them overnight in less than ideal conditions, transport them to a shady area outside each day, and be prepared for a longer curing time.
Wait until all moisture has evaporated from between the wrappers and cloves. You want a very dry, crackly feel to them and brown, wilted stalks and roots. If in doubt, leave them another week or turn fans on them. Commercial growers even remove one or two outer layers to aid internal drying.
Storing Cured Garlic
When the bulbs are ready, cut the stalks to about an inch above the bulbs and gently remove any remaining dirt: Again, don’t rinse them. It defeats the purpose of curing the plants.
Save the largest bulbs for replanting about a month prior to the first hard frost in your area. In the south when winter is milder, and frost comes later, check with your local garden shop for good timing in your area.
Hang the bulbs in net sacks that prevent moisture from accumulating. The storage area temperature that is ideal is about 35 to 50 degrees Fahrenheit. Bulbs can last from four to eight months, sometimes longer. If you have some of that garlic harvest left after that time, consider grinding into powder; it sometimes helps extend reasonable life.
Post written by Sara Woods from Coupon Croc. Find all of the gardening supplies you need online, and save when you use Littlewoods discount codes.
Latest posts by Canadian Home Trends (see all)
- Creating the Perfect Outdoor Kitchen - April 23, 2024
- Classic Luxury Kitchen Design - April 23, 2024
- Color Journey: Spring 2024 - April 23, 2024