
As seen on CityLine.
Screens are hot right now and are the ultimate in creating privacy or just plain making a tall statement! Jonathan Adler has a certain panache for them in his colourful , cheerful interiors and the Great Gatsby movie made screens the must-have versatile accessory of 2013!
I often incorporate screens into my projects and use them to separate and define a space, or get creative and use one as a headboard in the bedroom. Used in the corner of the room, screens can display beautiful blankets and throws or become a unique way to hang towels and warm up a cool bathroom .
The folding screen is a star almost anywhere in the home and inspiration to create them is everywhere! For instance, a few of my design compadres recently designed cool up-cycled versions of doors (some up-cycled into screens) purchased from the Habitat for Humanity Restore Toronto which were on displayed at the Toronto National Home Show!
I am very excited to see what some of my friends’ crazy creative minds have come up with (be sure to vote for your favorite creation!) Even easier is my Ikea “Hack” version as seen on Cityline – an easy DIY screen that can be done in a few hours using simple products like side units from IKEA IVAR storage shelves and pegboard, paint and hinges from box hardware stores like Lowes.
Materials Required:
- 3 IKEA IVAR pine side unit panels
- 3 – ¼” HDF Panel Peg Board 8’x4’ cut to size
- 6 – 3” Door Hinges – finish of your choice
- Screwdriver
- Pencil and Ruler
- 1 quart of latex or exterior paint
- Standard paint brush
- Yarn
- Large Plastic Sewing Needle
- Staple Gun or Lepage’s No More Nails glue
Instructions:
1. Cut the peg board into panels to fit the inside dimensions of the IVAR frames. Allow for 2 panels per frame – one panel for each side.
TIP: Home Improvement Stores like Lowes offer an inexpensive cutting service.
2. Paint the frames and the panels – colour and finish of your choice. You can also stain the frames, or use panels without pegholes if painting, depending on your creative vision for the screen. If using the screen outdoors, exterior paint, latex or marine varnish is preferred.
3. On the sides of each IVAR frame, use a pencil to trace the outline and position each door hinge. A door hinge should be positioned 12 inches from the top and bottom of the frames, with a third hinge positioned at the mid point between the other hinges. Affix the hinges in place with a screwdriver and screws.
TIP: Make sure the hinges are placed to allow for the frames to open and close like an accordion.
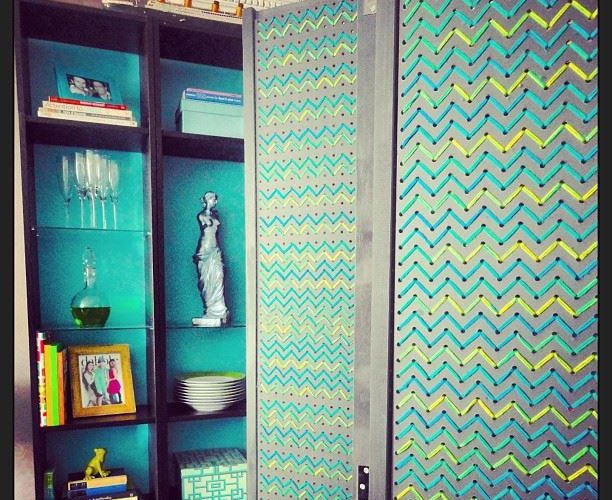
4. Create the screen panels using the artistic technique of your choice
For a sewn screen panel:
Use a large size plastic sewing needle and yarn to create your desired sewn pattern through the holes of the pegboard panel as the base. Chevron, Cross Stitch, or Random sewing patterns are on-trend. Try using several colour yarns or varying the thickness of the yarn by adding a double strand to each stitch.

For a painted screen panel:
Paint the panels a contrasting colour to the frame or colour to match. Consider painting the panels into several blocks of colours, painting on a motif, painting stripes or a painted faux panel effect
For an upholstered panel:
Cover the panels first with a thin layer of upholstery foam or batting and then cut enough fabric to completely wrap the panel, holding the foam and batting in place. Use a staple gun to secure.
TIP: Sew buttons through the pegholes to create a perfect tufted effect.
5. Affix the panels into the IVAR frames with No More Nails and/or a staple gun. For a less permanent fix, you can also tie the panels into place on the frame crossbars with strong nylon threaded through the panel holes.
Latest posts by Nicholas Rosaci (see all)
- Glamorous Office Design - April 20, 2024
- Nicholas Rosaci’s Modern Canadian Cottage Design Board - April 20, 2024
- How Do You Make An Easter Special? - April 20, 2024