
My “grans” is truly special and she is the “Mod Podge” that holds my family together. This November she will celebrate her 100th birthday! At almost 100 years old, she is in amazing health and she would like to “age in place” – a common trend among “active” seniors who prefer to remain in their own homes as long as possible.
My grandmother’s 1960’s condo boasts large rooms with retro/original design elements that look than she does. Her bathroom and kitchen are literally crumbling and in desperate need of a renovation. As an early birthday present, I am planning on creating a savvy senior design plan to update her beloved home and make it safer for her changing needs. The best part of all is that I plan to do it in true DIY manner, using accessible senior-friendly products and materials all sourced from Home Depot.

DRESSED TO DIY
Fashion won’t save the world or this demolition from the DIY Guy! My grandmother was nervous about having a lot of tradespeople in and out of her condo so I took on the project of doing all the demolition myself. I’m quite proud that we got all of it done in only 3 days!
Designing for the elderly means addressing the physical limitations that one faces as they get older. For example, getting in and out of the bathtub has become much more difficult and sometimes a scary experience for her. That is why the first room that I plan to makeover is her bathroom! Converting a bathtub into an easy entry free standing alcove shower with grab handles, and an adjustable handheld shower on a slide bar is a great solution for her mobility issues.
 Almost everything in this bathroom dates back to the day it was built – 1968 to be exact! A previous owner wallpapered over the original wall covering and used sticky linoleum tiles to cover the aged mosaic tiles on the bathroom floor – clearly this is a “what not to do” DIY lesson.
THE PIPES AND LIGHTS ARE CALLING!
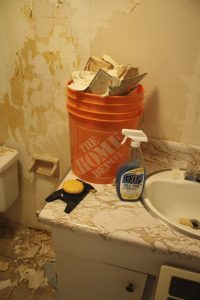
- The vanity and plumbing fixtures are literally crumbling from years of use and my grandmother recently cut her arm reaching inside to place a bucket to catch a mystery leak. I’ll be updating the plumbing so that it is modern and safe.
- And don’t get me started on the lighting – or lack of it. Dark and depressing, table lamps gives off a soft glow but it is dangerously situated near the wet sink. In any project, always consider the
 plumbing and electrical requirements at the very beginning of your design process.
 - The vanity is often the first item that is removed in a bathroom reno. Remove the screws holding the vanity to the wall, cut any caulking, turn off the water valves and disconnect the sink. Voila! Another method would be to simply smash it to pieces using a sledge hammer and crowbar. (Remember to wear appropriate protective gear when renovating your bathroom.)
- Corroded and paper thin, the pipes under her vanity were so close to the edge of failing and causing a complete disaster!
- Multiple layers of wallpaper were glued over top of each other like a bad paper mache project from grade school! I often tell people although some designers may say it’s ok to do this, don’t!
OFF THE WALL
There are many methods to remove wallpaper – from machine steamers to homemade solutions of hot water and fabric softener – and all of them require a lot of patience! I used Dif – a concentrated spray gel that sticks to the lightly scored wallpaper and after a few minutes, makes the paper easier to scrape off. It still takes a lot of elbow grease and sweat to remove the paper – but that’s ok if you like getting a work out. Underneath it all, the beautifully plastered walls were in good condition and I suspect they have not seen the light of day since the building was built!
MAD MOSAICS
This bathroom features a masterpiece of mosaic tiles everywhere!  In their day they were probably quite lovely but after nearly four decades on the wall they are hideous and need to go! I used a floor scraper to remove the tiles quicker but I still had to use a cold chisel and hammer for areas of that seemed to be hold on. To say I got a work out from removing these tiles would be an understatement. Home Depot also rents out more heavy duty floor tile remover tools in case you wish to skip the tile removal work out.
TORNADO PROTECTION
They say demolition is the hardest part or a reno but not quite as hard as putting it all back together. I say nothing could be harder than removing the bathtub! After much pulling and crow-barring to free the hidden bathtub flange from the wall, I purchased a very inexpensive Angle Grinder with a metal cutting blade from Home Depot and simply cut the tub in half. 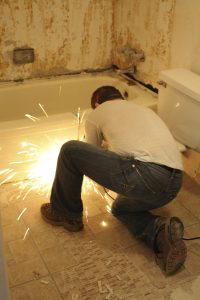 I could have used a reciprocating saw with a metal cutting blade – the standard saw in many home workshops and a key demolition tool – but it would have taken longer. With a little more pushing and pulling the bathtub was free at last, and cutting it in half made it easy to dispose of. Just remember to wear safety glasses, a dust mask, and appropriate gloves and clothes to protect yourself from anything harmful.
STOP THE CART
Now that all the demolition is complete I can actually get to what I do best – designing! I can’t wait to share the really fun and affordable stuff I have picked out to rebuild this tired bathroom into a savvy senior sanctuary!
Stay tuned – Nicholas Rosaci

Latest posts by Nicholas Rosaci (see all)
- Glamorous Office Design - July 6, 2026
- Nicholas Rosaci’s Modern Canadian Cottage Design Board - July 6, 2026
- How Do You Make An Easter Special? - July 6, 2026