Text by D. Evans
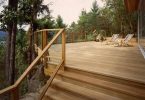
Gazebos come in all styles and sizes but from the fanciest to the plainest they all have these elements in common. A roof to keep the rain and sun off, screened walls to defend against our voracious mosquitoes and a floor to deal with the prairie mud. If you check out your friendly neighborhood supply store you should find dozens of plans for gazebos. Most of them are pretty fancy but the structure described below should be well within the skill level of most back yard homesteaders. A cautionary note though, before you build anything check with your local authorities to make sure your plans comply with local building codes and zoning regulations.
If you plan to make your floor from pre-cast cement sidewalk slabs, measure the slabs on order and work out how many slabs wide and how many slabs long you want to make your gazebo. Allow about one-quarter inch spacing between the slabs. If you design your structure so that the inside dimensions work out to an even number of slabs you will save yourself a lot of work.
Now that you have established the inside measurements select a site. Ideally a level bit of ground not too close to other buildings and taking advantage of the best view to be had. Mark out your floor on the ground and remove the turf and dirt down to a depth of three inches or so. If you then fill this excavation with screened sand it will make a fine base for your cement slab floor. The level of the sand should be an inch or so above the grade when it is well tamped down to ensure good drainage. If you lay the slabs at this point you will have a level place to work and will save a lot of wear and tear on the lawn.
A gazebo measuring about ten by sixteen feet will give you lots of room for a generous picnic table and your barbeque, with room to move around.
Be sure that the floor is square and level. Using a post hole auger, drill holes at the four corners of the floor. Holes about eighteen inches deep will be sufficient. Locate the holes so that when four by four cedar fence posts are placed in them the sides of the posts will line up with the sides of the floor. In the holes on one of the sixteen foot sides plant two ten foot posts and tamp them in well with coarse stone chips or better yet, concrete, being careful to keep them even with the floor and vertical. In the two holes on the other sixteen foot side plant two twelve foot poles, tamp them down. Check on the width of screening available and plant additional posts along the sides, enough so that your screening will reach between them.
Measure up eight feet from the floor on the outside of your short posts and ten feet from the floor on the outside of your taller posts. Mark a square line around the posts and cut them off nice and even. On the inward facing side of the taller posts mark a line at the height of the shorter posts. Cut a short piece of two by four and nail it to the inside of the taller post at this line, then add a similar short piece to the inside of the short post even with the top of the post. Rest a two by four on the two short pieces and nail or screw it down solidly. This two by four should just reach the inside edge of the post but not go over it. Do the same at the other end, it is not necessary to do this in the middle.
Make the posts along the long sides all the same height, a laser level is great for this job but a nice tight string will do the trick. Nail a two by four along the tops of the shorter posts. Nail a second layer of two by four on top of the one you just put on the short wall only this time lap over the top of the one that runs along the long wall. Do this at both ends, and then run a second layer of two by four along the long wall on the short side bringing the ends flush to the second layer you just put on the short wall. Run a double layer of two by fours along the top of the higher wall.
At this point it is very important that you ensure that the upper part of the building is square by confirming that the diagonals, as measured from opposite corners are the same. You may have to tack on a length of board or two to hold things in place until the structure starts to take shape.
Measure the distance from the outside of the top of the higher wall to the outside of the top of the lower wall, add two feet to this and buy enough two by sixes to make your rafters. Placing a rafter every twenty four inches will be sufficient. Take one of your rafters and tack it to the outside of the building so that the bottom of it is even with the outside of the high wall and even with the inside of the low wall with a foot projecting at each end. Take a pencil and mark the position of the top of each wall on your rafter and also the position of the vertical line even with the inside of the wall. Voila! You have a template for cutting your rafters and with a little careful sawing they should sit snuggly on the top of the wall. With the building nice and square cover the roof with plywood, allowing an overhang on the short ends. You can apply sheet metal or shingles according to taste but you should use deck screws to fasten the plywood down as it provides some of the structural strength of the gazebo.
Toe nail in some pieces of two by four between the posts on the high side with their bottoms level with the bottoms of the two by fours on the short wall. Build a frame for a door in one of the short ends, how this frame is built will depend on the door you use but if you are not too handy at hanging doors an inexpensive screen door ready hung in a casing is your best bet.
Set a row of cement blocks on the ground between the posts, cut two by fours to fit between the posts, set them on top of the cement blocks and nail them in solidly. This gives you a place to tack on your screen that is up off the ground and will prevent dancing feet from going through the screen. Tack on the screen.
Fill in the two by sixteen foot section just under the roof on the high side and both the wedge shaped areas under the roof on the short ends of the building with plywood. You can cover this with some fancy shingles or slabs later but the plywood will add a lot of strength to the building. Putting the plywood on after the screen means it will cover the top edge of the screen. Cut some pieces of the same plywood to the length and width of the uprights and use this to cover the edges of the screen.
If you are in an area subject to high winds it is a good idea to get some six inch pieces of that perforated metal tape used by plumbers, and make ‘hurricane’ joints to ensure a strong connection between the rafters and the plate that carries them and the plate and the wall posts.
Building a simple gazebo can be fun and rewarding. You will enjoy the whole thing more if you take the time to carefully measure all the items such as screening and roofing you plan to use and adjust your building dimensions to make the best use of them.
Latest posts by Canadian Home Trends (see all)
- Dining Room Design Tips - July 18, 2025
- Practical Luxury in Forest Grove - July 18, 2025
- The Hidden Value of Great Design - July 18, 2025