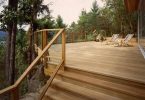
Knowing what you’re doing and what you will need is essential when starting a new DIY project. We’ve made building a patio easier than it’s ever been. Our top tips will have you calling yourself a DIY guru!

What You Will Need:
Before you begin, you will need to gather all of your tools and supplies to make it possible!
- Spade
- Garden hose or mason line and stakes
- Plate compactor or tamper
- Landscape fabric
- Wheelbarrow
- Builders sand
- Paver base (gravel/limestone)
- PVC pipe
- Pavers/Bricks/Flagstones
- Broom
- Polymeric jointing sand
- 2×4 board
Top Tips:
Mark All of the Utility Lines
Before you start anything, ensure that there are no buried cables or lines. The last thing you want is to cut or burst a pipe or cable – you’ll have an even bigger problem on your hands, and this one, you won’t be able to DIY!
Outline Your Patio and Remove All Sod
You need to get a good idea of the shape and size of your new patio. Do this by using stakes and some mason line or laying your garden hose on the ground.
It is best to build a bigger patio if you are unsure about the size. Making it bigger once it’s complete is a lot more challenging.
Use your spade and remove any soil and sod from the area you’d like to build on. Excavate a base around 22.86cm deep and include the thickness of the paver, flagstone, or brick.
If you are building close to your house, slope the patio away from your home. This applies if you are making a patio by your garages as well.
Make use of a level and make a 2,54cm drop every 1,22m. Then use the tamper to compact all of the dirt. You can use the leftover soil for compost or around the patio’s foundation.
For the Base, Add Landscape Fabric
Now you need to line the whole area with some landscape fabric. You may need to cut it a bit so that it fits better. This is done to prevent any weeds from sprouting between the stones.
Build the Base
Then add your paver base to the area. This may be limestone or gravel. The layer should be around 15,24cm deep. If you decide to use limestone, then wet the material a little using the garden hose. Use the tamper to make the base firm.
If you choose gravel, you will need to spread a thin layer of some builder’s sand over it.
If you used limestone, you would need to finish it off with levelling sand. First, lay two PVC pipes across the length of your patio space; you may need to cut them to fit.
Spread some levelling sand over it. Then lay the 2×4 over the pipes. Make it level, remove the pipes and fill the holes with some sand.
Add Pavers or Stones
Start on one side, and start adding the pavers or flagstones. Keep making sure that it is level, and place the stones or pavers close to one another.
Top It With Some Sand
Once all of your pavers or stones are beautifully in place, you will need to top them with some polymeric jointing sand. Ensure that every crack is filled, and use your broom to sweep the sand over it all.
You can use a leaf blower to remove excess sand and then mist the surface with your hose to make the sand sink into all cracks and spaces.
After building, you will need to add sand, sweep, and water for about a week. This ensures that your patio will be durable.
Install Some Patio Edging
Once all of your pavers or stones have been placed, you will need to install restraints or edging outside your patio. This ensures that the pavers stay in place and that the patio is secure.
Maintain It
Now the fun starts. You can decorate your patio and add tables, chairs, or pot plants. You can add more sand, sweep, and water if some stones start to wobble over time.
Clean all stones at the start and end of the summer or outdoor seasons. Clean it using a scrub or pressure washer to prevent stains and mildew.

Final Thoughts
Building a patio is fun and relatively simple. Use our tips and make sure that your build is secure and level. Soon enough, you can show off your DIY project to your friends and enjoy a barbie and some drinks on the new patio!
Latest posts by Canadian Home Trends (see all)
- 2026 Design Trends: The Evolution of Home Design - July 13, 2026
- Expert Bathroom Design Secrets from Canada’s Best - July 13, 2026
- Treasure Hunting: Discovering Unique, Locally Made & Vintage Home Décor - July 13, 2026


I’ve always wanted an area outdoors where my family and I can enjoy dining together with our beautiful garden view or just spend quality time together, which is why I have decided to get a patio built this July since it felt like the perfect opportunity to do so. I’m thankful for your reminder when you told us to install patio edging once we have placed our pavers since this will serve as the restraints that will keep the pavers in place to secure the patio. I’ll be sure to remember this while I look for patio builders to hire for help this summer.