Materials Required:
Materials and tools available at Home Improvement stores such as Lowes:
- 4 – Primed Pine Boards 1” x 2” x 8’
- Mitre Saw, Table Saw or Hand saw
- Pencil
- Ruler
- Sanding block or power sander
- 120 and 180 grit sandpaper
- Tester sized paints – your choice of colours
- 6 Threaded rods – ¼” 20 – 36” lengths
- 12 Acorn nuts – ¼” 20
- Small Hack saw, power saw or rotary saw (i.e. Dremel) with metal blade to trim threaded rods
- Small metal file
OPTIONAL:
Wood Stain and Natural Pine boards
Instructions
1.Cut the Wood
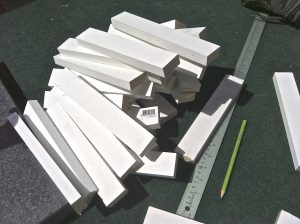
Cut the wood boards in half (4 feet) for easy handling, then cut into 9” length pieces for a total of 38 “slats” of wood. Many home improvement stores like Lowes offer a wood cutting service if you don’t have all the tools required or wish to have the wood precut.
CAUTION:
Always wear a protective dust mask, eyewear and clothing when cutting or sanding
2.Drill the Holes
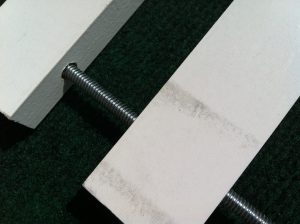
Use a 5/16” drill bit, and with a power drill or drill press, drill 2 holes total into the thin side of each slat, along the center line. Each hole should be 1-1/8” from the ends of the slat. Lightly sand the wood with 120 and 180 grit sandpaper for the smoothest finish with a simple sanding block or power sander
TIP:
Use a ruler and pencil to measure and mark where the holes should be placed on your very first slat. Drill the holes to create a “template” slat. Position an unmarked slat evenly aligned with the template slat so the“thin” sides are against each other, and insert a pencil into the template holes to mark the position of where to drill the holes onto the unmarked slat. Mark and drill the holes into the remaining slats
3.Paint the Slats
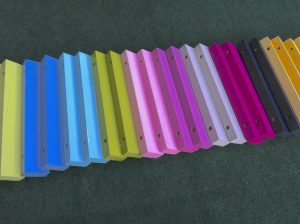
Apply 2 coats of paint to all sides of each slat – your choice of colours
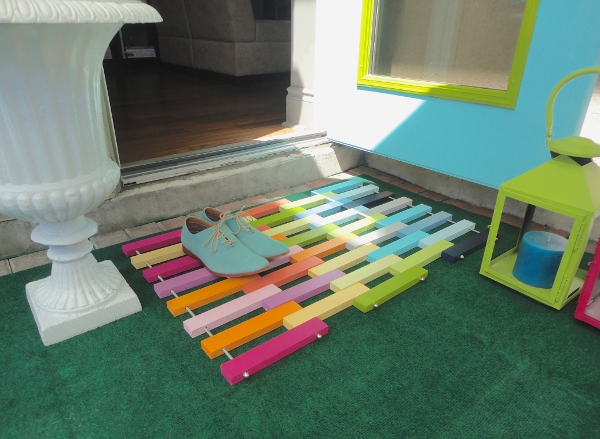
4.Assemble the Mat
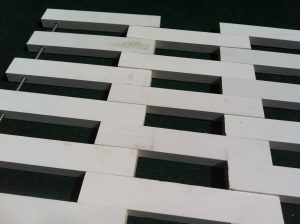
Layout 8 slats aligned into a column vertically on the table, each slat spaced 1” apart from each other. Insert a threaded rod into holes along the left-hand side of the slats and screw an acorn nut on each end of the rod.
Then create a second vertical column of 7 slats placed into the open 1” spaces of the first column, making sure to keep the drill holes aligned. Insert a threaded rod into the holes to interconnect the first column of 8 slats to the second column of 7 slats. Place an acorn nut on the threaded rod ends to secure.
Continue creating the mat using the threaded rods and acorn nuts to interconnect alternating columns of 8 slats with columns of 7 slats. The first third (middle) and fifth (last) columns should have 8 slats and the second and fourth column should have 7 slats each
5.Trim the Rods

Trim the excess length off one end of the threaded rods leaving about ½” of rod exposed on each end of the mat. Use a hack saw, power saw or rotary tool that has a blade for cutting metal to trim the rods, and file smooth with a metal file. This will ensure the slats of wood will stay tightly in position.
OPTIONS AND MAINTENANCE
Plan to sand and refinish the mat once each year. Use a coat of clear outdoor varnish to protect your mat
Consider using raw unfinished pine board and various colour wood stains for a more natural rich look or use PVC boards for easier maintenance.
Alter the size of the mat as you wish by simply purchasing longer threaded rods and making additional slats. Whether painted or stained, this custom mat is sure to add excitement to any entrance
Latest posts by Nicholas Rosaci (see all)
- Glamorous Office Design - July 26, 2026
- Nicholas Rosaci’s Modern Canadian Cottage Design Board - July 26, 2026
- How Do You Make An Easter Special? - July 26, 2026


I love this idea of the colored entry mat! What is great about it is that you can make such a statement with the colors you choose! I made something similar where I had bright colors on the sides of the wood but a charcoal color on the top.. so at first it looked dark but when you looked more closely you saw neon colors on the edges of each piece of wood, looked really cool. There are so many possibilities. I also find the best inspiration for color is the Color911 app! (Color911.com) You can create your own palette of colors or look at many themes each with a completely different look. Love it.. dont do any DIY project without it!