Dear Marc:
The holidays are here and my tree isn’t decorated yet! I’ve been procrastinating as I don’t really know how to properly decorate a tree. Can you give me a crash course on how to decorate a Christmas tree?
Jeremy
Dear Jeremy:
There is no way to ignore it, the holidays have arrived and they’ve brought carolers, festivities, and busier than normal shopping destinations. This time of year is a dream for a seasoned designer but for others, it can be daunting. You see a naked tree sitting in your living room wondering how in the world you are going to make it look like the ones you see in stores?
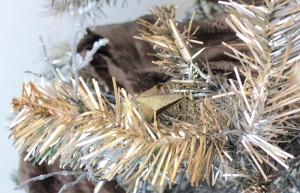
I had quite an adventure decorating our tree this year! I spray painted my wife’s tree silver with gold and copper accents. Let me give you my first tree decorating tip. If you are going to spray paint a tree, do it in a well ventilated area!
There is a certain art form to decorating a tree. In order to achieve the desired look, examine the shape of the tree. It is essentially a glorified cone. Apply the balance and proportion rule of design to its cone shape. The rule states, “Visually balance opposing sides and choose design elements in proportion to their inhabiting environment”. Therefore, while decorating your tree, use large scale ornaments towards the visually heavy bottom end and balance colour and ornaments on opposing sides of the tree.
Supplies:
– Artificial tree
– Ornaments in various shapes and sizes
– 3-4 dark brown drape panels with a sheen
– Scissors
– Gold and silver berries
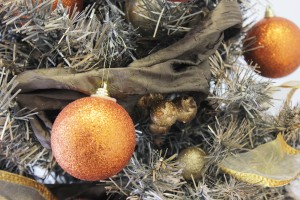
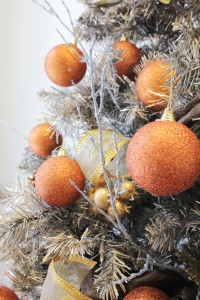
– Silver, white, gold and copper glass ornaments
– Silver tree skirt
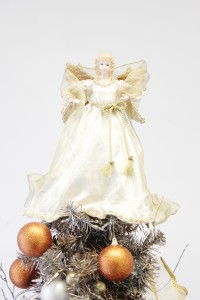
– Tree topper
– Gold ribbon
– Silver, gold and copper Krylon spray paint
Step 1:
Spray the tree! Yes, that’s right. We’re spraying our green tree in silver with accents of gold and copper to give it a glamorous look! Give it two coats and let dry.
Step 2:
Cut the drape panels in twelve inch lengths and wrap the fabric around the tree as you would with a garland. Be sure to vary the depth of your circular wrapping motion as to have a less monotone look.

Step 3:
Grab a glass of eggnog, here comes the fun part! Layer the ornaments in little clusters to make a larger impact. Think of them as “room settings”. You want to see little areas in your tree that will draw your eye. Once you’ve created these areas, dress the the tree with ornaments to offset these clusters.
Step 4:
A little ribbon and a few branches go a long way. Take a step back and analyze where the eye stops. You want to keep the eye moving to discover new areas, which means, if it stops in the middle of the tree, you need to add other elements to keep the eye moving. Add ribbon spirals (see tip below) and silver painted branches to fill distinct areas in the tree. Tip: To make a ribbon spiral, cut a nine inch length wired ribbon diagonally and wrap it clockwise around your finger. Grab each end and stretch it to get a long spiral effect.

Step 5:
The finishing touches. Add a luxurious tree skirt and a tree topper and there you have it, a designer tree!
Latest posts by Marc Atiyolil (see all)
- Classic Luxe Dining Room Design Board - July 6, 2026
- Marc’s Bold Viva Magenta Living Room Design Board - July 6, 2026
- His Take, Her Take: LG OLED Objet Collection Posé TV - July 6, 2026